Wednesday, October 31, 2012

Halloween 2012

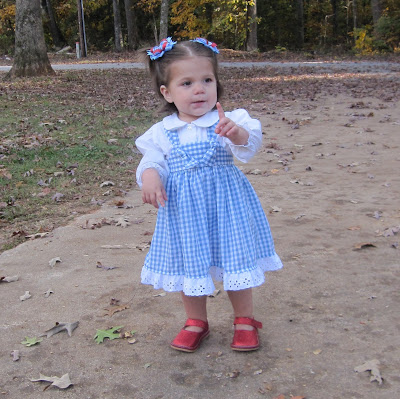
Happy Halloween!  We had a little party for our kids at church tonight, and Kate loved seeing all of the other kids all dressed up.  She particularly liked the costume of another little girl who is about her age.  The little girl was dressed up as a puppy and Kate would rub her back like she was petting her and would say "woof woof".  Too cute.  Here is me and my little Dorothy. 


I've talked about how much Kate loves music.  She particularly likes hearing drums, and lately she's loved PLAYING drums.


Check out that concentration...


Happy Halloween to all of you! Hope it was as much fun as ours. :) 


Sunday, October 28, 2012

Meal Planning & Random Pics

So, how many of you plan out your meals each week in advance?  I got so tired of driving home from work and thinking "what will we do for dinner" that I decided to give it a try.  It does take a bit of work, but I love it!

Each Sunday I make a Target/Ingles run to pick up the things we will need for the week and then I'm set for the week.  I usually write our meals on a dry erase board on our refrigerator.  Kevin hijacked the board last week and put in his OWN ideas....


I had to laugh when I saw.  It actually took me a few days to catch it.  I think he had some good ideas, don't you?  I guess he thought that it was his turn to "cook" on Sunday. :)

Anyway, I really only plan about 3 meals for the week.  Typically I plan to cook on Monday, Tuesday, and Thursday.  Unless we use the crock pot, we don't have time to cook on Wednesdays so that's a leftover night.  And, we never know what we are going to be doing on the weekend, so I leave those open.  Plus, I don't want to over plan meals for the week so I don't waste groceries if we end up doing something different.  It's worked well for us.

This is a short week for us because we are heading out on a quick beach vacation Thursday evening.  Since the temperatures are supposed to be dropping, we'll be having this for dinner on Monday & Tuesday...


Ingredients:
2-3 boneless skinless chicken breasts1 can of cream of chicken soup1 can of cream of celery soup (I subbed cream of mushroom and it was great)3 15-oz cans of chicken broth1 small onion, choppedchopped carrotschopped celery1 tbsp dried parsley flakes1/2 tbsp celery seedsalt and pepper to taste1 can of biscuits (Grands), cut into 6 pieces each

Place everything except for the biscuits into the crock pot and cook on low for 6ish hours.

Then take out chicken and shred it or chop it- whatever is easiest.  Place the chicken back in the crock pot and add the biscuits.  Cook for about 1.5 more hours on low.    

I finally posted this recipe over on my Recipe Blog, so it's there for my future reference.

Happy Halloween week!


Thursday, October 25, 2012

We're Off To See The Wizard!

Last Halloween Kate was just a few months old, so it was a holiday that was more for ME than it was for her.  And let's face it.  She's only a little over 1 this year, so again this is a holiday more for ME than for her.

Last year I really wanted to dress her up as Dorothy from the Wizard of Oz, but I figured I would save it for when she was more than a teeny, tiny baby.  So last year I dressed her up as a watermelon.  She will probably kill me for this when she gets older, but it was so much fun. :)


This year it was finally time for Dorothy, though.  I pieced together her costume from different places.  The white peter pan shirt came from a consignment store, the dress from an Etsy shop (Grammas Hugs & Stitches), the shoes from a Facebook flash sale, and the bows from yet another Etsy shop (Lebelle Boutique).  I tried it all on Kate last night for a test run, and of course for a photo opportunity!  Here is my sweet little Dorothy!


Unlike last year, Kate will actually get to "dress up" for a few Halloween activities.  This weekend we'll be heading to Boo in the Zoo and then next week she'll get dressed up again for our church's Halloween activities.  Halloween is such a fun holiday. :)  Anybody else have a little Dorothy?  Or maybe a watermelon?  I love to see what ideas other families come up with!


Monday, October 22, 2012

Let's Talk Money... for Kids

This past Sunday's message was a continuation on our parenting series.  This week, the main point was that parents should teach their children to manage their money.  

Honor the Lord with your wealth, with the firstfruits of all your crops; then your barns will be filled to overflowing, and your vats will brim over with new wine.
Proverbs 6:6-8  

Every good thing we have comes from God, and we owe Him the first and best of everything He gives us.  We should teach our children to get in the practice NOW of tithing – giving God a TENTH of their income. But also, we should teach them to get in the practice of giving God extra – an OFFERING.  We should teach them to give because they want to, and to manage their money in a way that ALLOWS them to give an OFFERING.  

Additionally, we should teach our children to be generous with everything that they have been given (time, toys, money, etc).

One person gives freely, yet gains even more; another withholds unduly, but comes to poverty.  A generous person will prosper; whoever refreshes others will be refreshed.  
Proverbs 11:24-25

Whoever is kind to the poor lends to the Lord, and he will reward them for what they have done.
Proverbs 19:17

Of course the best way for us to teach our children is to lead by example, but there are some things that we can do to help them visually see how we can manage our money.  Even before Kate was born, I saw this idea on Pinterest and thought it was a GREAT way to help teach children about money.  On each jar label, you write what the money should be for.  On the ones below, they wrote give, save and live, but you could write whatever you wanted.   


So after Kevin's message this week, I went back to Pinterest and looked these up again to see if this was something I could DIY or if I'd need to let the professionals do it. :) It's definitely DIY-able, and Lil Light of Mine even went so far as to give a tutorial on how to make these yourself, and where you can buy all of the materials.  Score!  I think this will be my next project.

(PS- Lil Light of Mine is the same store that has these awesome ABC Scripture Cards that I've mentioned on here before.)

And on a totally unrelated note, here are a few quick pictures I got after church.  In honor of her first Clemson game, she wore her sweet smocked Clemson dress. :)


Sunday, October 21, 2012

Go Tigers!

On Saturday we took Kate to her first Clemson football game of the season.  We took her TO a Clemson game last year, but didn't take her into the stadium.  This year was a little different.  We decided to take a chance, and bring her into the game. 

It was a noon game so we left our house at 8am and met my family over at their car for a bit of tailgating. :)  This picture makes me happy.  Kate loves her Papa Rick.


LOTS of my family came up (or down) for the game, and we had to get a group shot.


And then it was time to head into the game. As you can see from the following pictures, Kate's attention was everywhere EXCEPT from the camera. 


Family picture!  I love seeing ALL of us in Clemson orange! :) 


Kate's favorite part of the game was the flyover.  She was a bit unsure of it when she first heard the noise, but after this all she wanted to do was point at the sky and go "ohh, ohh".  She loved the blimp.  Not sure if she knew that the fighter planes that flew over and the blimp were not the same thing.


This video is about a minute and a half long, but check out Kate's reaction toward the end.  She's definitely unsure until the planes pass by, and then the clapping and pointing starts. 


And then it was game time!


We stayed for exactly one quarter.  Although it was only in the upper 60's (supposedly), it felt much hotter in the stadium.  Kate was so flushed that we decided to take her back to the car to attempt a nap.  She had been up for 7 hours, which is a very long time for her.

I walked around with her in the stroller for a good 30 minutes, hoping she would fall asleep.  She was exhausted but with all of the excitement, it was impossible to get her to nap.  We decided to head home and started walking the 1.5+ miles back to our car.  Of course she fell asleep about 2 seconds before we got to the car.  Typical.


She slept all the way home and then another 2.5ish hours after we got home (about 4.5 hrs total). Yeah, she was tired.  Maybe next year she will make it through a whole game. 

Thursday, October 18, 2012

DIY Bows- Tutorial

I attempted to make a few bows for Kate not long after she was born, but it was just too hard.  I couldn't figure out how to get the little-bitty ribbons to do what I wanted, so I gave up.  It was much easier (and actually cheaper) to buy plain bows at Hobby Lobby.  They came in 2 packs for about $3.  I spent more than $3 on one roll of ribbon and mine still didn't turn out as good as the ones from Hobby Lobby.

Well, last Friday night I decided I wanted to try my hand at bow making again.  Now that Kate is bigger, I can use the larger size ribbon.  So, I tried to make her a bow to wear to the pumpkin patch.  I thought it turned out pretty good for my first real attempt...


One of my friends saw it and asked if I followed a tutorial, and if so, could I share it.  Well, I really didn't have one that I followed.  I googled and found a few different websites, but then put together what I liked from each and kind of did my own thing.  So I thought I'd share what I did...

For the below bow, I used 3 pieces of 1" ribbon, about 15 inches long.  I think the larger 1.5" ribbon is easier to use so that's what I'll probably use in the future. For the green/orange bow, I used 2 pieces of 1.5" ribbon and 1 piece of 1" ribbon. 

You'll also need a clip (found them at Hobby Lobby), needle/thread, and a hot glue gun. 


First, fold over your ribbon as shown below.


Then thread your needle through the ribbon as shown.


Pull the thread tight to cinch your bow together, and then wrap the thread around the ribbon a few times.  Stick the needle back through the bow and tie off in the back.


 Repeat the process for all three pieces of ribbon, until you have three small bows.


Next, stack all three bows on top of each other, layering them so you see the different patterns. I usually take my needle and stick it through the center of all three bows, and then wrap the thread around the stack a few times.  Stick the needle back through the stack and then tie it off.  Almost finished!

I bought a "K" pin at Hobby Lobby for this bow so I just pinned it to the middle of my bows.  Instead of a pin, you can take a small piece of ribbon and tie a knot in it.  Then hot glue the knot to the center of your bow and wrap the ends around the back.  Glue them down.


Hot glue the clip to the back of the bow, but be careful not to glue the clip together!

Lastly, burn the ends of the ribbon to prevent fraying.  I still need to do that on this latest bow.

And that's it!  I am definitely no bow expert, but it is fun making them!  I think I'll stick with the wider ribbon from here on out though!


tmb

Related Posts Plugin for WordPress, Blogger...

Follow on Bloglovin
Ebates Coupons and Cash Back

tmb banner


Designed by Munchkin Land Designs • Copyright 2014 • All Rights Reserved